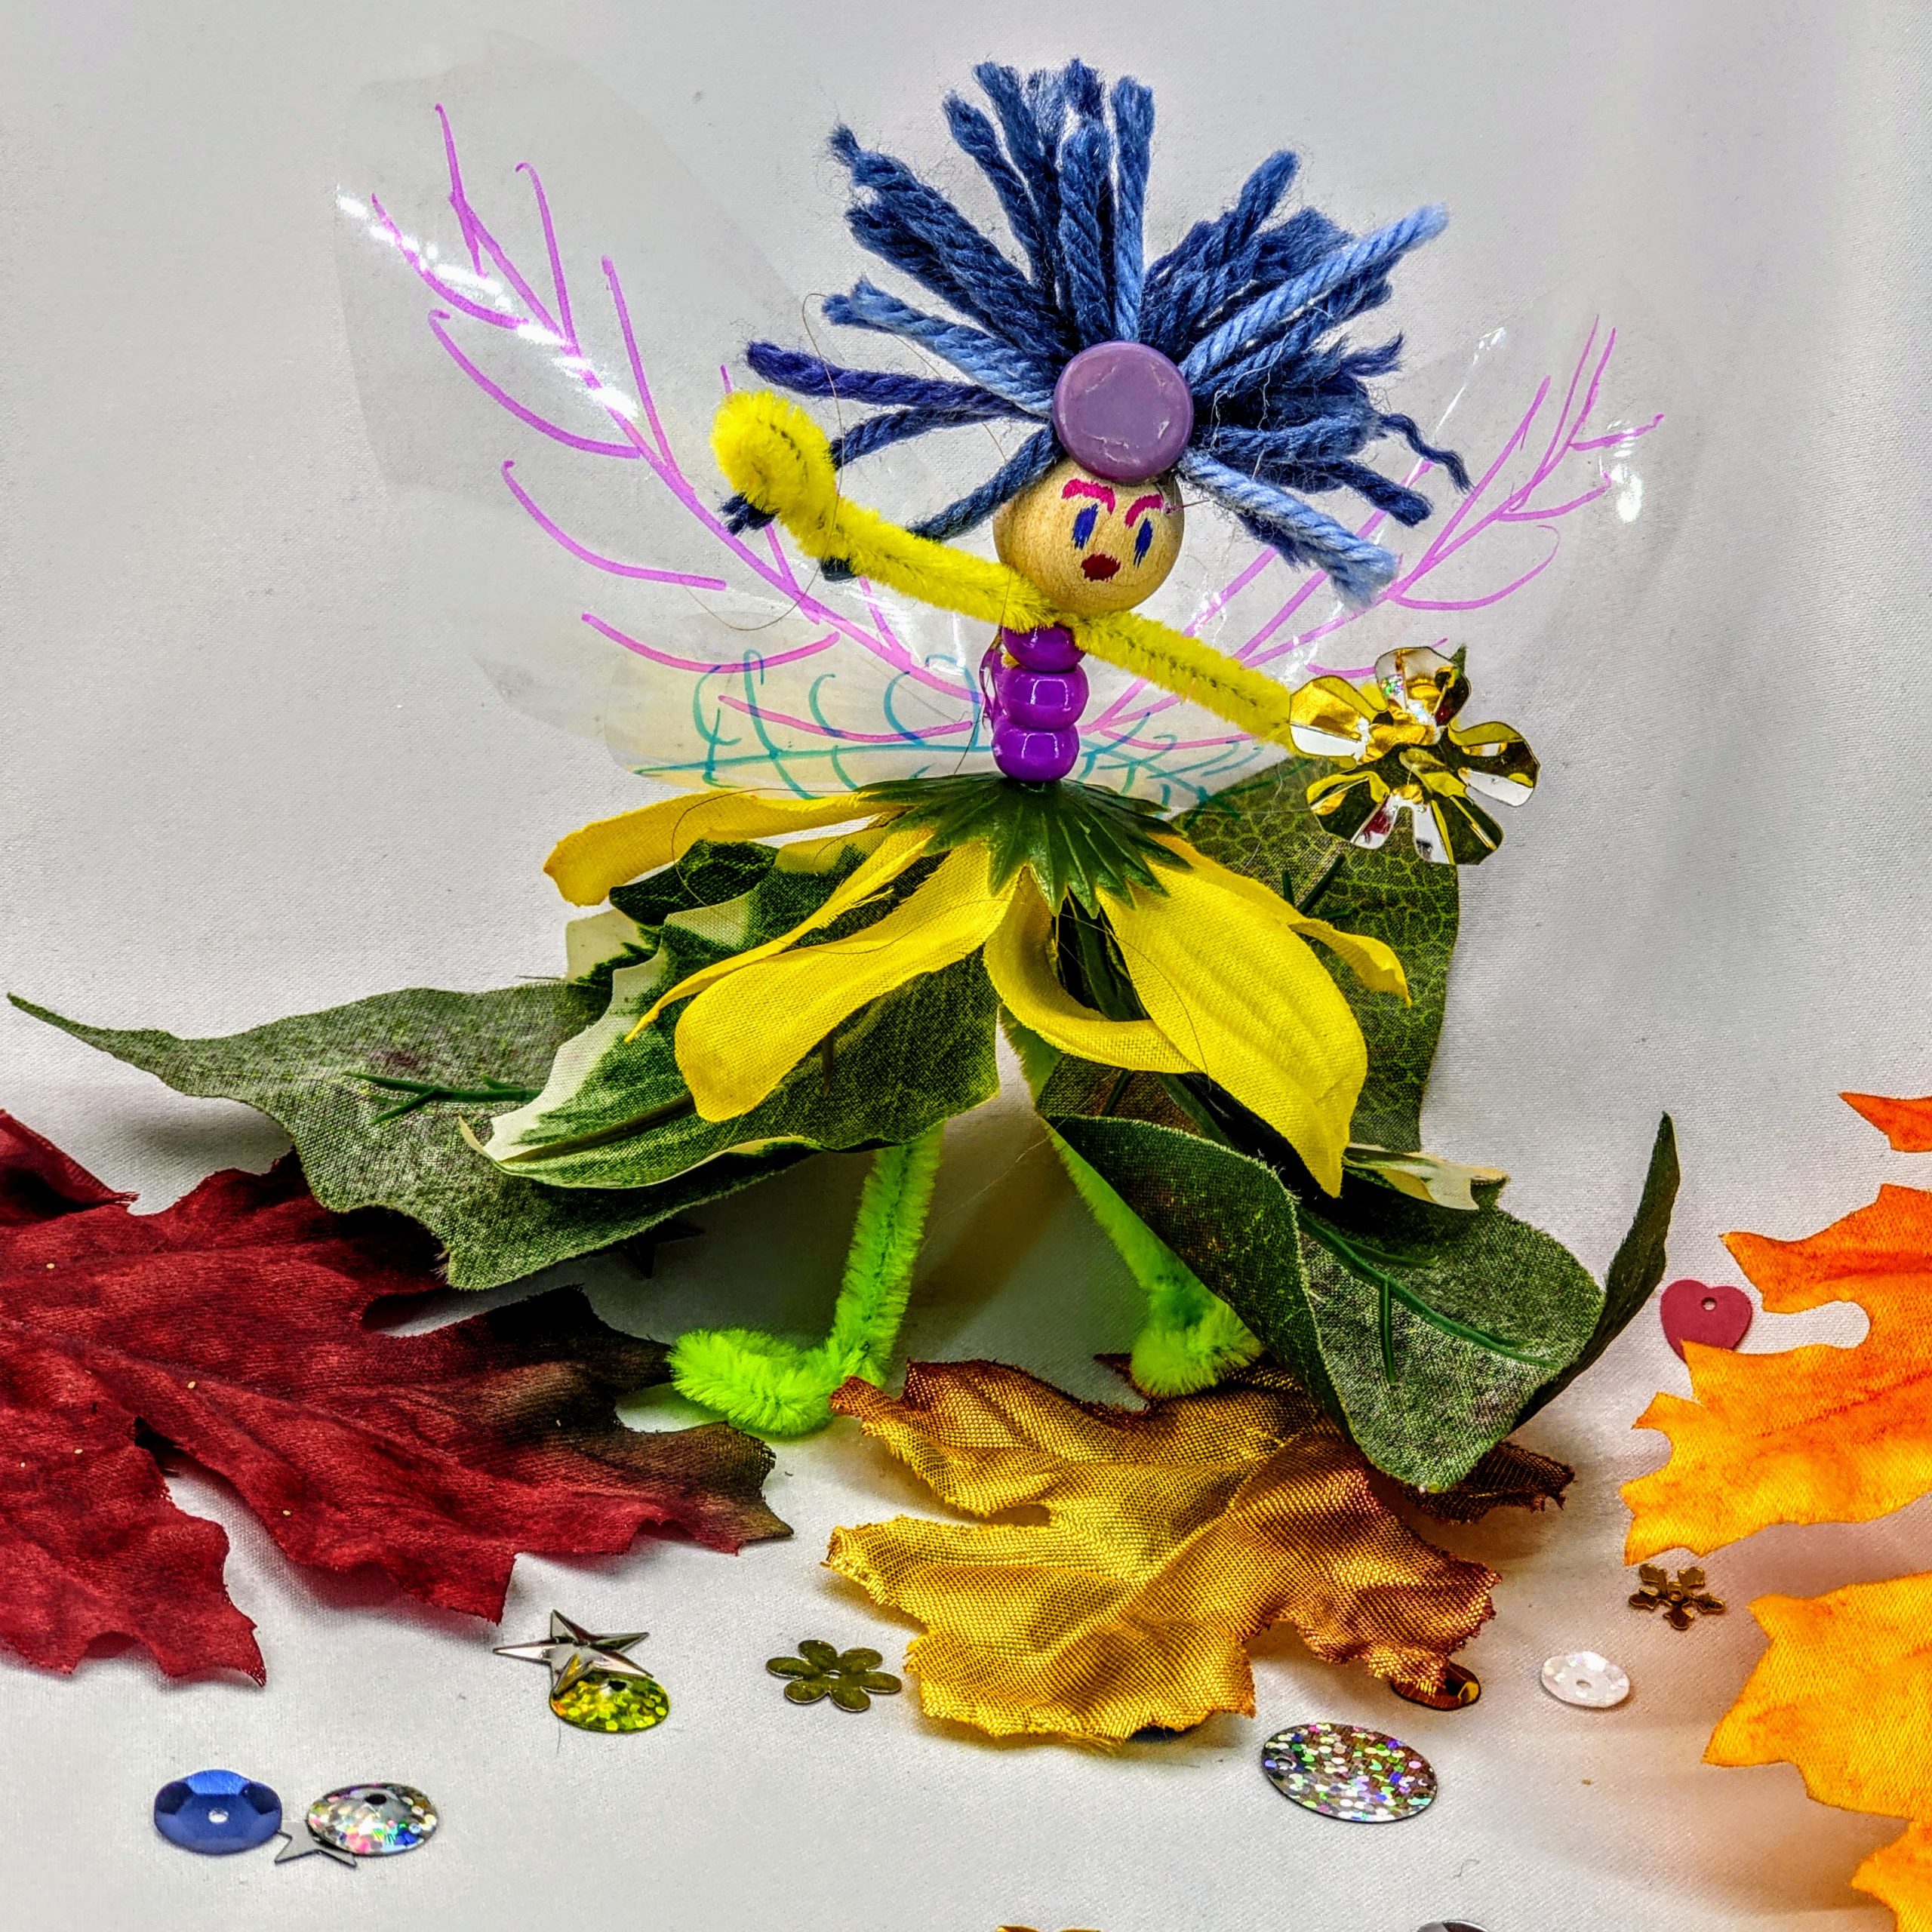
a flower fairy craft

Flower Fairies

We made some flower fairy friends! We also made a flower fairy rock band…


…crafting offline? Download a PDF of the instructions here

Supplies: 

  • Silk/fake flowers or garland (we are going to take them apart)
    (Motley Kids will often raid the home decor section at Goodwill for garland and flowers, or this is where you can send your old holiday garland when it’s worn out)
  • Glue Gun or Craft (tacky) glue
  • Scissors 
  • Large round beads (we usually do about a 1″ bead) or air-dry clay/Model Magic type compound
  • Chenille Stems/Pipe cleaners
    • One full length
    • One cut in half
  • Yarn or string
  • Smaller beads (pony beads work well)
  • Sharpie or other permanent markers (fine point)
  • Cellophane for wings (wax paper also works well)
  • Fairy decorating supplies
    • Buttons
    • Acorn caps
    • Fabric
    • Ribbon
    • Sequins etc

For Extra Fun (at the end of the video): 

  • A large disposable plastic cup
  • Construction paper 

Steps to Make It

  1. Disassemble your silk flowers — gently pull the flowers off the stems or cut the stems to free the petals and set the stems aside.
    We’re just going to use the flower petals (and leaves). 
  2. Take a chenille stem and fold it in half. This will be your fairy’s body
  3. Wind about 10-15 loops of yarn around your fingers
    1. the more fingers you use the longer your fairy’s hair will be
    2. the more loops you make the thicker your fairy’s hair will be
  4. Hook the chenille stem through the loops so they are hanging off the bend in the middle
  5. Thread your large bead onto your folded chenille stem (both ends) and push it up as far as it will go — it should pinch your fairy’s hair and hold it in place
  6. Your fairy’s hair is still a big loop.  Cut the loop to free the ends up.
  7. Wrap your half chenille stem around the folded one just below the large bead.  These are your fairy’s arms
    1. Fold the hands in so you don’t have sharp ends
    2. You can use little beads or air-dry modeling clay if you need bulkier hands
  8. Thread a couple of pony beads onto the folded chenille stem to make your fairy’s body
  9. Thread the chenille stem through the holes in your flower petals so that the petals point down. 
    Try layering several different petals or leaves!
  10. Thread one more pony bead onto the chenille stem to secure your skirts
  11. Separate the two legs of the chenille stem and fold some feet
  12. Put an awesome face on your fairy with your Sharpies
  13. Decorate your fairy!
    1. You can make wings with cellophane or parchment paper
    2. Fairies love sparkles and bling
    3. Use a button or acorn cap to make a hat!  

Want to craft live with us? Catch our next Craft-a-long on Twitch!

See our streaming schedule here!

a flower fairy rock band


A UFO and a pompom alien

DIY UFOs & Pompom Aliens

Join the Motley Kids for a journey into space! We’ll make a paper plate UFO and then create pompom aliens to invade with!


…crafting offline? Download a PDF of the instructions here

Supplies: 

UFOs

  • Two paper plates (any plates will do but sturdy plates are better)
  • One paper bowl (again, sturdy is better)
  • A clear(ish) plastic cup, bowl, soup container, etc for your cockpit (this should be SMALLER than the bottom of the bowl)
  • Craft glue or low-temp hot glue
  • Paint, markers, stickers, and other bling for your UFO
  • Pompoms and sequins for your cockpit

Pompom Aliens

  • Cardboard for making pompom forms
  • Yarn (acrylic fluffs extra well)
  • Something large and round to trace around (about 3 inches across is good)
  • A round bottle cap to trace around
  • Scissors
  • Chenille Stems (pipe cleaners)
  • Googly Eyes and Alien Decorating Bling
  • Glue (glue guns or glue dots work best)
  • Bling

Steps to Make It

UFOs

  1. Glue your two paper plates together around the rims (the eating part is inside)
  2. Glue a paper bowl to the bottom of one paper plate to make your capsule (the eating part is still inside)
  3. Pick out your favorite alien sequins and pompoms
  4. You can glue some googly eyes on the pompoms if you want 
  5. Put them in your cockpit cup or jar
  6. Glue the bowl side of your UFO onto the jar by turning the UFO over  (do not turn the jar over! Your aliens will escape!) 
  7. Turn your UFO right side up
  8. Decorate your UFO!

Pompom Aliens

  1. Set your round thing on your cardboard and trace a circle. You can use different sizes of round things to make different sizes of aliens!
  2. Cut out your circle
  3. Put your bottle cap in the middle of your circle and trace it
  4. Cut a thin space from the outside of your circle to your inside circle
  5. Cut out your inside circle. This is your Alien Hatching Device (also known as a pompom maker)
  6. Wrap yarn around your Alien Hatching Device until it’s completely covered—this may take a few minutes, so be patient. 
    1. To keep your yarn from sliding, hold the end and wrap over it a few times
    2. Leave a space near the gap so your yarn doesn’t fall off
  7. Use scissors to cut along the edge of the Alien Hatching Device until all of your yarn is sticking out of the sides of the middle circle.
    (It should stay in place if you’ve made your alien Super Fluffy)
  8. Use a spare piece of yarn to tie tightly around the middle of your alien
    (this is an important knot so If you are not a Super Good Tie-er ask your Responsible Adult to help)
  9. Pull your alien free of the Hatching Device
  10. Fluff well!
  11. Trim scraggly bits with scissors if needed
  12. Use a chenille stem (or two or three) to make legs, arms, and antennae
    Wrap them around the middle of the pompom
  13. Add googly eyes or bling!
  14. Prepare to Invade!

Want to craft live with us? Catch our next Craft-a-long on Twitch!

See our streaming schedule here!

a paper plate spaceship and pompom alien

an upcycled garden

Upcycled Garden

We’re making a garden out of things we found in our kitchen! Come join us in this craft-a-long to make butterflies, bugs, and flowers.


…crafting online? Download a PDF of the instructions here

Supplies: 

Egg carton Flowers
  • An egg carton (foam or paper mache will work)
  • Chenille stems/Pipe
  • Cleaners (green if you want to be realistic)
  • Tissue paper
  • A pony bead or button
  • School glue (You may want a paintbrush to apply the glue)

Bottle Cap Beetles
  • Bottle Caps (screw-off tops are better)
  • Clear plastic lids (we aren’t picky about the type this time)
  • Sharpies
  • Googly Eyes
  • Bling
Coffee Filter Butterflies
  • Coffee filters
  • Chenille Stems
  • Water-based markers
  • Optional: Clothespins You will also need scissors, craft glue, and optionally glue guns

Steps to Make It

Egg Carton Flowers
  1. Cut one cup of your egg carton into a flowery shapes
  2. Thread a pony bead or button onto your chenille stem and bend it in the middle. Twist it once or twice to secure. 
  3. Push the ends of the chenille stem through the bottom of your egg carton cup. The bead should help keep it from pulling through. 
  4. Cut some small tissue paper squares and glue them onto the egg carton cup to make your flower brightly colored!
Bottle Cap Beetles
  1. Use your sharpies to color your bottle caps.  If you choose to paint them instead, make sure to let them dry completely before gluing!
  2. Cut a pair of wings out of the clear plastic lid. We suggest either cutting them out as a pair (think like a figure 8) or making sure you have a flat edge. 
  3. Use your Sharpies to decorate your wings
  4. Glue them onto the bottle cap
  5. Add some googly eyes and bling!
Coffee Filter Butterflies
  1. Use your markers to make spots on the coffee filters 
  2. Fold the filter “accordion style” and then fold once in the middle
  3. Use a chenille stem to tie it together at the fold
  4. If you want to have flowy butterflies, set the fold of the coffee filters in a cup of water for a few minutes — then let dry before expanding
  5. Expand your butterfly’s wings
  6. Curl your chenille stem into antennae
  7. If you want, hot glue your butterfly to a clothespin!
craft stick snowflakes

Snowflake Craft!

It’s the winter holidays, and snow is in the air! We aren’t having much luck with the actual thing here at Motley Headquarters, so we decided to make some snowflakes of our own! Craft along with us in this video tutorial or just follow the instructions below!

…crafting offline? Download a PDF of the instructions here

Snowflake Supplies

  • Craft sticks (you’ll need three per snowflake)
  • Opaque paint (acrylic or tempera will work) and paintbrush
  • School glue or Mod Podge
  • Glitter or mica powder
  • Small cups (disposable is best) for mixing glitter glue
  • Sequins, pompoms, and other snowflake sparkles
  • String or twine
  • Scissors
  • A paintbrush you don’t mind getting glue on
  • Glue Gun or Tacky Glue

Steps to Make It

  1. Hot glue or tacky glue three craft sticks together in the middle to make your snowflake base
  2. Tie your string with a knot to make a loop
  3. Hot glue or tacky glue the string to the back of one of the top craft sticks to make a hanging loop
  4. Paint your snowflake a nice wintry color like white, blue, purple, or whatever you like
  5. Set aside and let your paint dry a little bit so it’s sticky
  6. Put some glue or Mod Podge into your small cup and add enough glitter (we know these are vague amounts, but glitter is like hot pepper—everyone likes a different amount)
  7. Use your glue brush to brush glitter glue on your snowflake
  8. Add sequins or other bling while the glue is wet
  9. Let dry completely before hanging!


a sock dragon

Sock Dragons

We’re making cozy pets to keep us company in the winter! Come join us in this craft-a-long and make a sock dragon of your very own! 


…crafting online? Download a PDF of the instructions here

Supplies: 

  •  Socks (any sock will do, although kids crew socks are about the right size)
  •  A large cup for filling your dragon with
  •  Rice or Beans, about 2-4 cups per dragon
    (unless you are using men’s socks, in which case you may need more)
  •  Tulle for wings
  •  Felt or cloth scraps for flames
  •  Buttons or googly eyes for eyes
  •  Markers to decorate your sock
  •  Sequins, pompoms, and other dragon decorating bling
  •  Scissors
  •  Glue Gun or Tacky Glue
  •  Warm Dragon Variant: Needle and thread

Steps to Make It

  1. Fill a large cup with rice or beans
  2. Stretch the top of the sock over the cup and hold it on while you turn the cup upside-down.
    All the rice should fit in your sock.
  3. Hold your sock open end up and lay it down carefully to keep the rice from falling out!
  4. Use a glue gun to glue your dragon flame onto the inside edge of your sock opening.
  5. Glue the sock opening shut so that the flame is in the middle.
  6. To make wings. take 1-3 strips of tulle about 12-18″ long and tie them together in the middle with a knot to make fluffy wings
  7. Hot glue the wings on the dragon’s back — be careful, tulle lets hot glue through
  8. Glue buttons or googly eyes onto your dragon’s head (or anywhere else)
  9. You can use yarn, tulle, felt, or cloth scraps to make a tail. 
  10. Use sequins, markers, and any other bling you have to decorate your dragon!

Warm Sock Dragon Variant:

  • Use a needle and thread to attach the tongue and close your sock dragon’s mouth (you may want to do two rows of stitching to prevent rice leakage)
  • Make sure your dragon’s décor is microwave-safe (no metallic sequins! Use lace not nylon tulle! Use thread to attach everything!)
  • Make your dragon warm by putting it in the microwave for 30 to 60 seconds (depending on microwave power)
a pirate hook made from a cup and foil

Craft Like a Pirate


September 19th is International Talk Like A Pirate Day!
In honor of this completely made-up holiday, the Motley Kids are going to craft like pirates!


Captain’s Hook

A handy hand for a pirate king! In this craft-at-home, we are going to make a pirate’s hook from aluminum foil and a plastic cup.

Pirates didn’t all have hooks for hands. But being a pirate was a dangerous job, and some pirates really did lose a hand or a leg. Today, people who have an amputation (where doctors remove a part of the body) can get a prosthesis (a replacement part) that’s made just to fit them. Some people get their favorite sports team or TV show printed on their prosthesis. But a long time ago, some people really did use a piece of wood or a metal hook to help do the job of a missing leg or arm.

Our pirate hooks are just for play! We won’t be cutting anyone’s hands off today, and just to be safe we’re going to have your Responsible Adult do the dangerous work.

You will need:

  • A disposable plastic cup (“Solo cup”)
  • A pair of sharp scissors or a sharp knife (for your Responsible Adult)
  • Aluminum Foil (heavy duty if you have it)

Making Your Hook

1. Have your Responsible Adult use the sharp obj
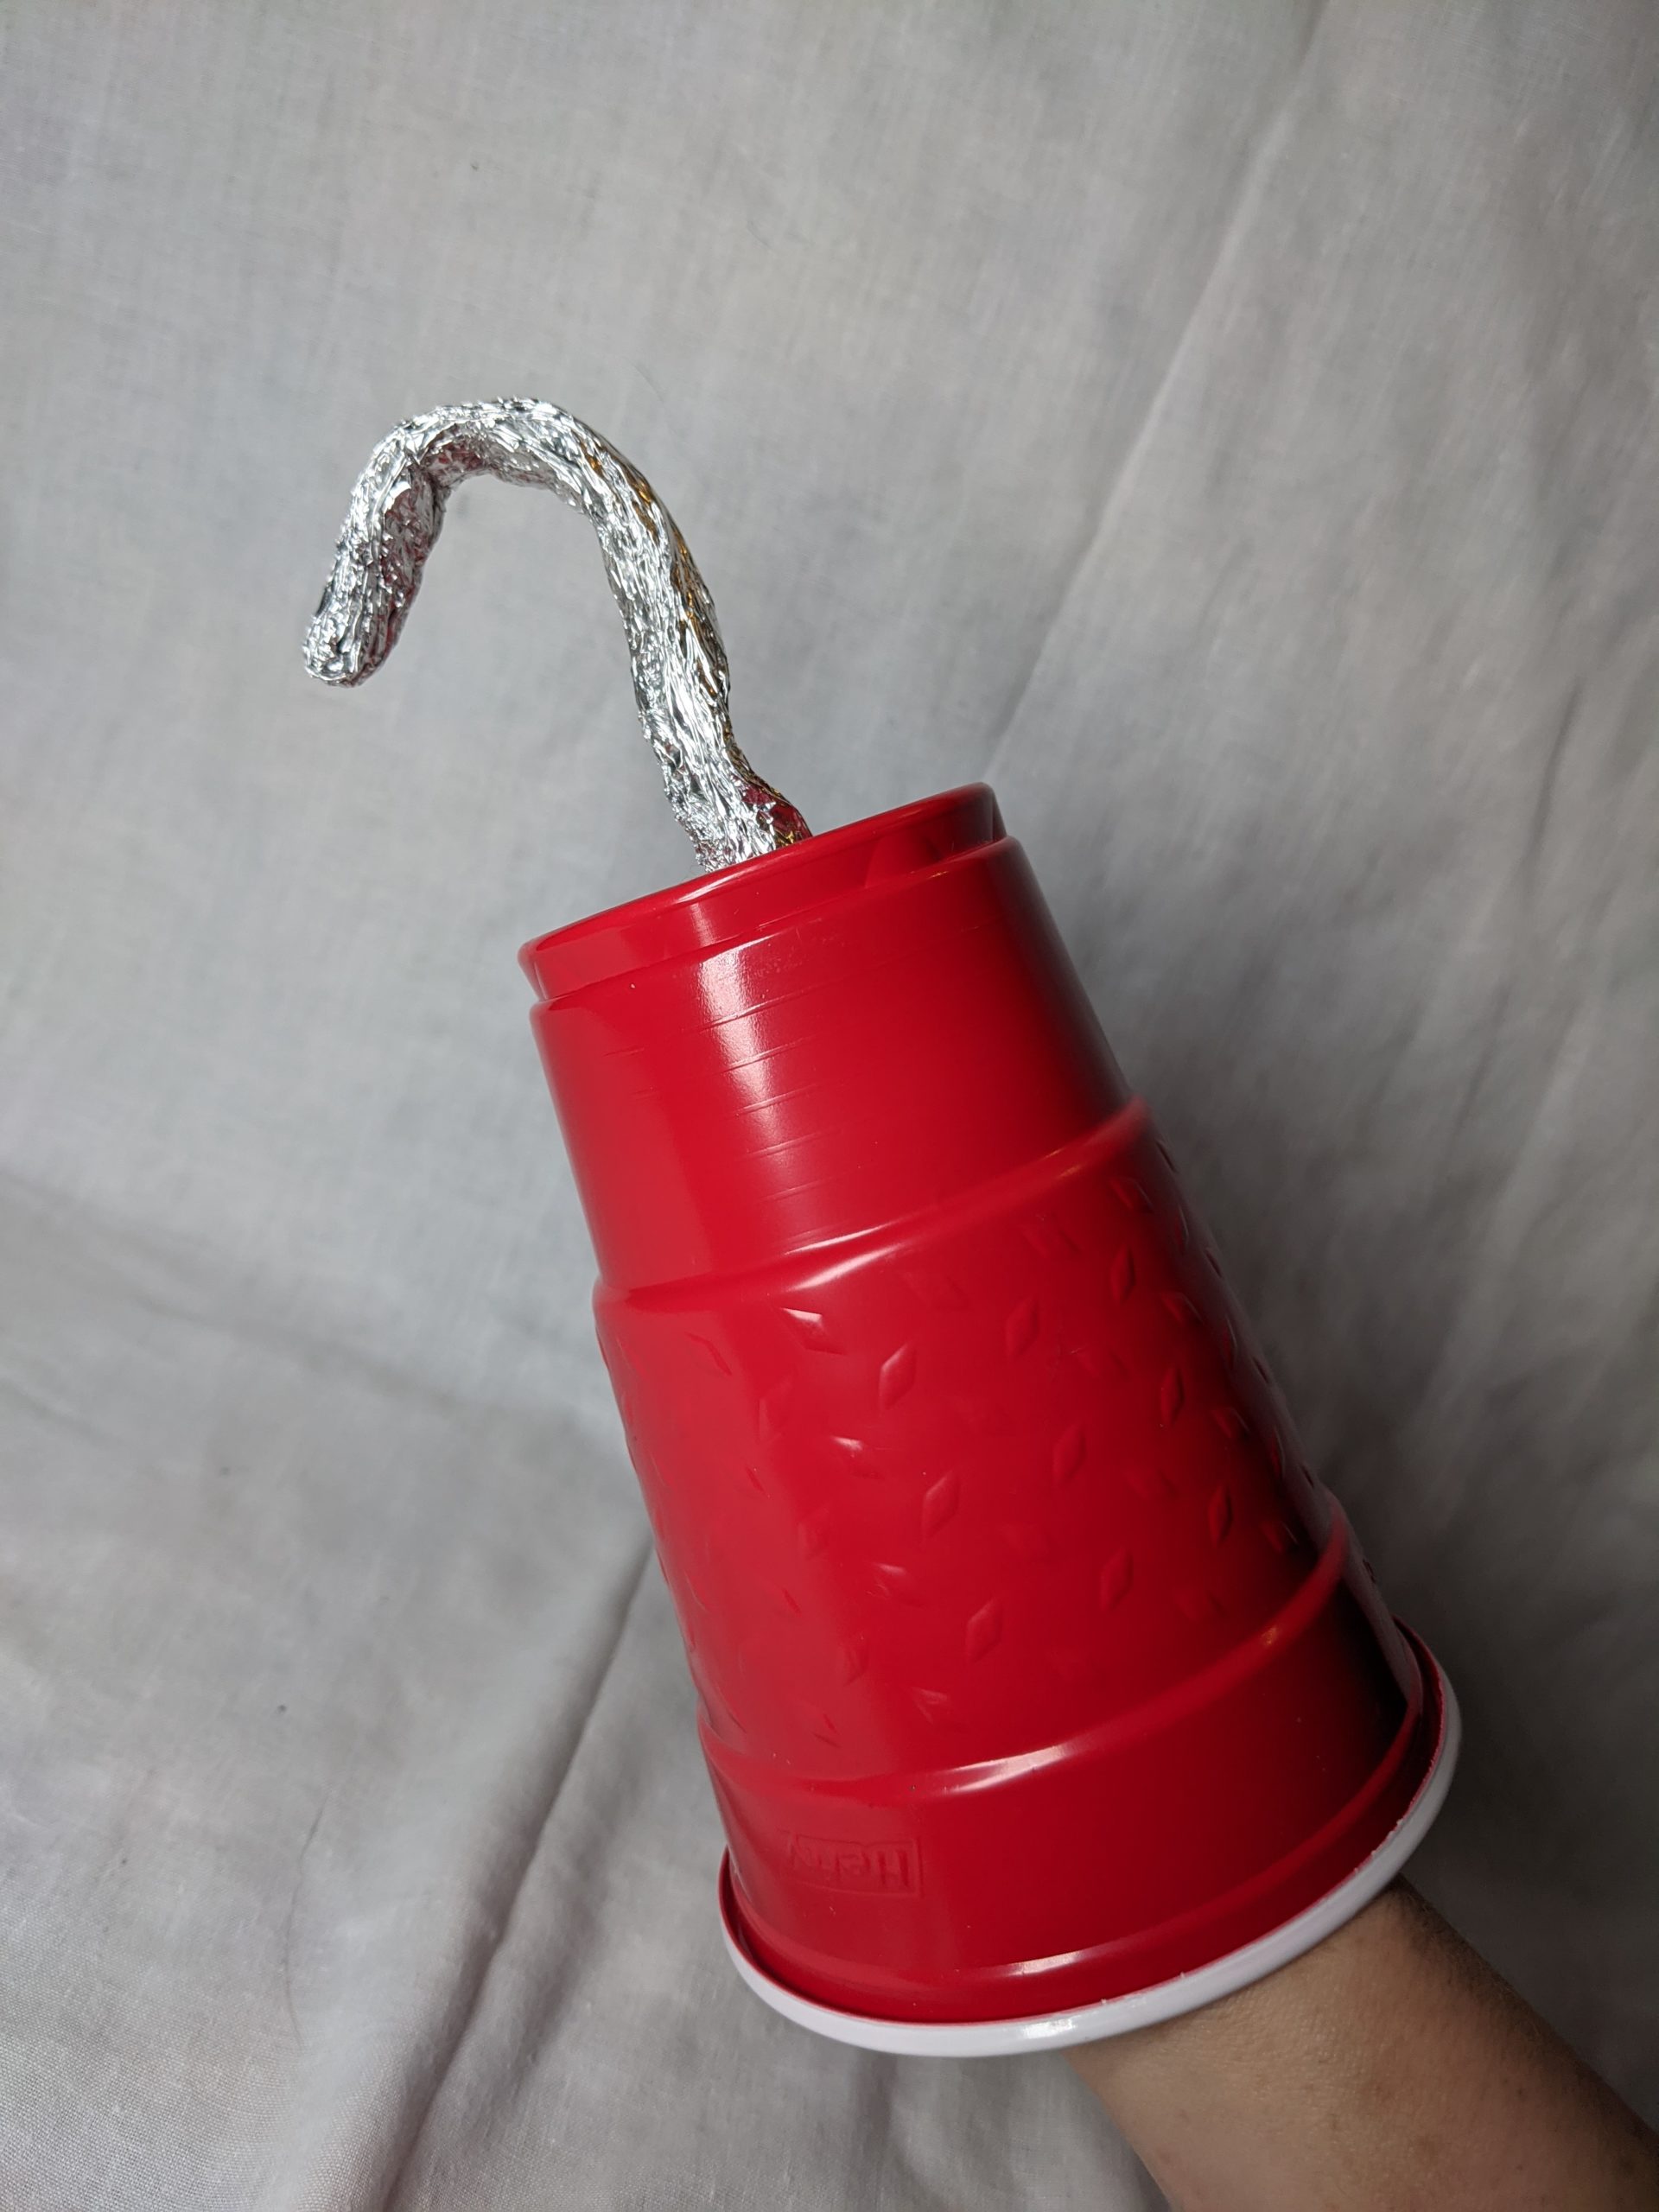
ect (carefully) to cut an X into the bottom of the cup. This is going to be your anchor.a tube of aluminum foil

2. Roll up your aluminum foil (shiny side OUT) into a stick. Make it about as thick as your pinky finger.

3. Fold your aluminum foil stick in half and stick the ends into the X in your cup so the folded end is pointing up.

4. Bend the ends INSIDE the cup outward to keep them from coming out and give you a handle.

5. Bend the ends OUTSIDE the cup into a hook. Reach into the cup and hold the bent ends.

Ahoy, Matey!